
HTML 5 Tags
There is a list of newly included tags in HTML 5. These HTML 5 tags (elements) provide a better document structure. This list shows all HTML 5 tags in alphabetical order with description.
List of HTML 5 Tags
| Tag | Description |
|---|---|
| <article> | This element is used to define an independent piece of content in a document, that may be a blog, a magazine or a newspaper article. |
| <aside> | It specifies that article is slightly related to the rest of the whole page. |
| <audio> | It is used to play audio file in HTML. |
| <bdi> | The bdi stands for bi-directional isolation. It isolates a part of text that is formatted in other direction from the outside text document. |
| <canvas> | It is used to draw canvas. |
| <data> | It provides machine readable version of its data. |
| <datalist> | It provides auto complete feature for textfield. |
| <details> | It specifies the additional information or controls required by user. |
| <dialog> | It defines a window or a dialog box. |
| <figcaption> | It is used to define a caption for a <figure> element. |
| <figure> | It defines a self-contained content like photos, diagrams etc. |
| <footer> | It defines a footer for a section. |
| <header> | It defines a header for a section. |
| <main> | It defines the main content of a document. |
| <mark> | It specifies the marked or highlighted content. |
| <menuitem> | It defines a command that the user can invoke from a popup menu. |
| <meter> | It is used to measure the scalar value within a given range. |
| <nav> | It is used to define the navigation link in the document. |
| <progress> | It specifies the progress of the task. |
| <rp> | It defines what to show in browser that don't support ruby annotation. |
| <rt> | It defines an explanation/pronunciation of characters. |
| <ruby> | It defines ruby annotation along with <rp> and <rt>. |
| <section> | It defines a section in the document. |
| <summary> | It specifies a visible heading for <detailed> element. |
| <svg> | It is used to display shapes. |
| <time> | It is used to define a date/time. |
| <video> | It is used to play video file in HTML. |
| <wbr> | It defines a possible line break. |
HTML <!DOCTYPE> tag
On the HTML document you have often seen that there is a <!DOCTYPE html> declaration before the <html> tag. HTML <!DOCTYPE> tag is used to inform the browser about the version of HTML used in the document. It is called as the document type declaration (DTD).
Technically <!DOCTYPE > is not a tag/element, it just an instruction to the browser about the document type. It is a null element which does not contain the closing tag, and must not include any content within it.
Actually, there are many type of HTML e.g. HTML 4.01 Strict, HTML 4.01 Transitional, HTML 4.01 Frameset, XHTML 1.0 Strict, XHTML 1.0 Transitional, XHTML 1.0 Frameset, XHTML 1.1 etc.
The <!DOCTYPE> declaration refers Document Type Declaration (DTD) in HTML 4.01; because HTML 4.01 was based on SGML. But HTML 5 is not SGML based language.
DTD defines the rules for the markup languages so that the browsers recognize the content correctly.
The doctype declaration differs between HTML versions. The HTML 5 doctype declaration is given below.
Syntax
<!DOCTYPE html>
Following are some specifications about the HTML <!DOCTYPE>
| Display | None |
| Start tag/End tag | Start tag only |
| Usage | Structural |
Let's see an example of HTML document with doctype declaration.
HTML Anchor
The HTML anchor tag defines a hyperlink that links one page to another page. It can create hyperlink to other web page as well as files, location, or any URL. The "href" attribute is the most important attribute of the HTML a tag. and which links to destination page or URL.
href attribute of HTML anchor tag
The href attribute is used to define the address of the file to be linked. In other words, it points out the destination page.
The syntax of HTML anchor tag is given below.
<a href = "..........."> Link Text </a>
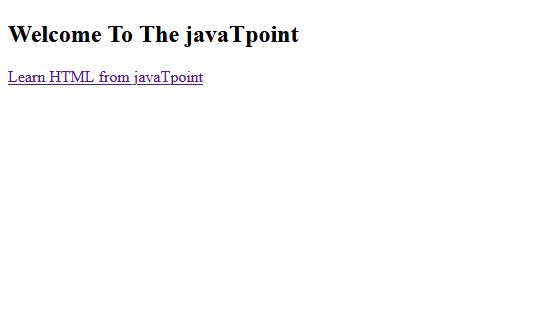
Let's see an example of HTML anchor tag.
<a href="second.html">Click for Second Page</a>
Specify a location for Link using target attribute
If we want to open that link to another page then we can use target attribute of <a> tag. With the help of this link will be open in next page.
Example:
Output:
Note:
- The target attribute can only use with href attribute in anchor tag.
- If we will not use target attribute then link will open in same page.
Appearance of HTML anchor tag
An unvisited link is displayed underlined and blue.
A visited link displayed underlined and purple.
An active link is underlined and red.
HTML <abbr> tag
HTML <abbr> tag is used to represent an acronym or abbreviation of a longer word or phrase, such as www, HTML, HTTP, etc. The content written between <abbr> tags renders with dotted underline in some browser.
This tag can be used with "title" attribute (optional), and the value of title attribute will be pop-up when the mouse hovers over the content written between <abbr> tag.
Syntax
Following are some specifications about the HTML <abbr> tag
| Display | Inline |
| Start tag/End tag | Both Start tag and End tag |
| Usage | Semantic/Textual |
Example
With title Attribute:
Example
Without title Attribute:
Global attributes:
The <abbr> tag supports the global attributes.
Event Attributes:
The <abbr> tag supports the event attributes.
HTML <acronym> tag (Not supported in HTML5)
HTML <acronym> tag is used with title attribute to contain a full explanation of an acronym content. When you hover the mouse on content, then it will show the explanation of word.
Note: The <acronym> tag has been depreciated in HTML5 and we can use <abbr> tag instead of <acronym>.
Syntax
Following are some specifications about the HTML <acronym> tag
| Display | Inline |
| Start tag/End tag | Both Start tag and End tag |
| Usage | Semantic/Textual |
Example
Difference between <acronym> and <abbr> tag
Although <acronym> tag is not supported by HTML5 but instead of that we can use <abbr> tag and we will get the same result using both tag.
Example
HTML <address> tag
HTML <address> tag is used to specify the authorship information of the article or webpage. It can contain any type of information which is needed such as, URL, physical address, phone number, email, other links, etc.
The <address> tag is useful for various contexts such as business contact information in the header of the page, or author related contact information, etc.
The contact information written between <address> tags mostly renders in the italic form on the browser.
Note: To represent a random address use <p> tag instead of <address> tag, as it should contain the main contact information.
Syntax
If you want to specify the information of the author for an article, you must place the <address> tag inside the <article> element.
Following are the specifications of <address> tag:
| Display | Block |
| Usage | Semantic |
| Tags | Start and end tag |
Example
Attributes
The <address> tag does not contain any specific attribute for it.
Global Attribute:
The <address> tag supports the global attributes.
Event attribute:
The <address> tag supports all Events attributes.
HTML <applet> tag (Not supported in HTML5)
HTML <applet> tag was used to embed the Java applet in an HTML document. This element has been deprecated in HTML 4.0 and instead of it we can use <object> and newly added element <embed>.
The use of Java applet is also deprecated, and most browsers do not support the use of plugins.
Note: The <applet> tag is deprecated in HTML4.0 and not supported in HTML5. So you can use <object> tag or <embed> tag instead of <applet>.
Syntax
Following are some specifications about <applet> tag
| Display | Block |
| Start tag/End tag | Both Start tag and End tag |
| Usage | Embed Applets |
Example
Attributes
Specific Attributes
| Attribute name | Value | Description |
|---|---|---|
| code | URL | It specifies the URL of Java applet class file. |
| width | pixels | It specifies the display width of the applet panel. |
| height | pixels | It specifies the display height of applet panel |
| align |
| It specifies the position of applet application relative to surrounding content. |
| alt | text | It is used to display alternative text in case browser does not support Java. |
| archive | URL | This specifies the archived or compressed version of an applet application. |
| object | name | It specifies the URL or reference to a serialized representation of an applet. |
| codebase | URL | It specifies the exact or relative URL of applets .class file specified in the code attribute. |
| hspace | pixels | It specifies the horizontal space around the applet. |
| vspace | pixels | It specifies the vertical space around the applet. |
| name | name | It specifies the name for the applet |
Global Attributes
The <applet> tag supports all Global Attributes in HTML
Event Attributes
The <applet> tag supports all Event Attributes in HTML
HTML <area> tag
Description:
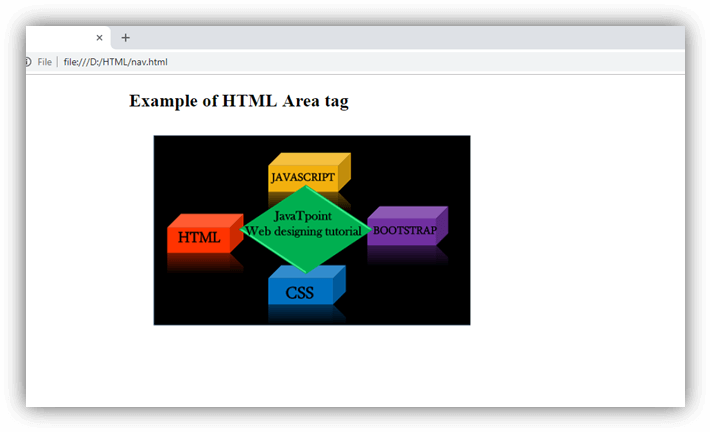
The <area> tag defines the clickable areas or active areas inside the image-map which are associated with the hyperlinks. If you click on those areas then it will perform some action such as open a new image, new URL, etc. This tag is always used with <map> element.
Inside an image map different areas can be hyperlinked to various locations using multiple <area> elements in a single <map> element.
The <area> element is defined with (required) attributes shape and coords. The shape attribute specifies the shape of the area such as rectangle, circle, square, and polygon. The coords attribute defines the coordinates of areas inside the image.
What is Image-map
An image-map is defined as a graphical image with active areas so that when user click on those area, it can link to different destinations. To define an image-map, we require the following things:
An HTML <img> element with usemap attribute which defines a valid map name.
- HTML <map> element with name attribute whose value must be same as usemap
- One or more <area> elements inside a <map> element which create clickable areas in an image-map.
Syntax
Following are some specifications about the HTML <area> tag
| Display | Block |
| Start tag/End tag | Only start tag(End tag forbidden) |
| Usage | Image Map |
Example
Attribute:
Tag-specific attributes:
| Attribute | Value | Description |
|---|---|---|
| alt | text | An alternative text String to display on the browser if it does not display the image. |
| coords | x1,y1,x2,y2(rect) | Defines coordinates for the upper left and lower right of a rectangle. |
| x,y, radius(circle) | Defines coordinates for the circle. | |
| x1,y1,x2,y2,x3,y3,..(polygon) | Defines the polygon vertices. | |
| href | href | URL It determines the hyperlink destination for the active area. |
| target | _blank | Open link in a new window |
| _parent | Open link in the parent frame | |
| _self | Open link in current window | |
| _top | Open link with full width in the same window | |
| frame_name | In the frame. (Not supported in HTML5) | |
| shape | default | It defines the default area(rectangular). |
| rect | It defines the rectangular area. | |
| circle | Defines the circular area. | |
| poly | Defines the polygonal. | |
| download | filename | Defines that hyperlink, which is used for downloading the resource. |
rel | alternate author bookmark help license next nofollow noreferrer prefetch prev search tag | It defines the relationship between current and linked document. |
| hreflang | language_code | It specifies the language of the linked resource. |
| type | media_type | It specifies the MIME type of linked source.(Not supported in HTML5) |
Global attribute:
The <area> tag supports the global attributes in HTML
Event attribute:
The <area> tag supports the event attributes in HTML.
HTML Article Tag
The HTML <article> tag defines an independent self-contained content in a document, page, application or a site.
The article tag content makes sense on its own. It is independent and complete from other content shown on the page. This tag is generally used on Forum post, Blog post, News story, comment etc.
HTML article tag example
Output:
Narendra Modi
(Naam to suna hi hoga)Narendra DamodarDas Modi is the 15th and current Prime Minister of India, Modi, a leader of the Bharatiya Janata Party (BJP), previously served as the Chief Minister of Gujarat state from 2001 to 2014. He is currently the Member of Parliament (MP) from Varanasi.
HTML article tag also supports global and event attributes in HTML.
HTML Aside Tag
The HTML <aside> tag provides information about the main content. According to W3C definition, the <aside> element represents content that forms the main textual flow of a document.
HTML aside is a new tag introduced in HTML5.
HTML aside tag example
Output:
I don't want to live in Ghaziabad, I wish; I could buy a flat in New Delhi.
HTML aside tag also supports global and event attributes in HTML.
HTML Audio Tag
HTML audio tag is used to define sounds such as music and other audio clips. Currently there are three supported file format for HTML 5 audio tag.
- mp3
- wav
- ogg
HTML5 supports <video> and <audio> controls. The Flash, Silverlight and similar technologies are used to play the multimedia items.
This table defines that which web browser supports which audio file format.
| Browser | mp3 | wav | ogg |
|---|---|---|---|
 Internet Explorer Internet Explorer | yes | no | no |
 Google Chrome Google Chrome | yes | yes | yes |
 Mozilla Firefox Mozilla Firefox | yes* | yes | yes |
 Opera Opera | no | yes | yes |
 Apple Safari Apple Safari | yes | yes | no |
HTML Audio Tag Example
Let's see the code to play mp3 file using HTML audio tag.
Output:
Let's see the example to play ogg file using HTML audio tag.
HTML bold tag
HTML bold tag is represented by <b> tag.
HTML <b> tag is used to display the written text in bold format. It is strictly a presentational element. If you want to show your text in bold letters and not have real semantic meaning, then put it within <b>.......</b> tag.
Difference between HTML <b> and <strong> tag
The b tag is explicit whereas strong tag is semantic.The <strong> tag adds extra semantic meaning to the HTML document.
It is recommended to use strong tag for bold format now.
HTML bold tag example
Output:
Hello guys, this is the method to write bold text.
Note: According to HTML5 specification, b tag should be used only if no other tag is appropriate. For example: If you want to write a heading, you must use the header tag <h1> to <h6>. Important statement should be denoted within <strong>.....</strong> tag, and the text you want to mark or highlight, must be put within <mark>...</mark> tag.
There is also a CSS 'font-weight' property to set bold text.
HTML <base> tag
HTML <base> tag is used to specify a base URI or URL to use for all relative links contained within an HTML document.
Only one <base> element can be specified within a document, and it must be placed within <head> element. We can also specify how other links should open (in the same window, in another window, etc.) using the target attribute.
Syntax
In HTML <base> element does not contain closing tag but in XHTML end tag </base> is required.
Following are some specifications about the <base> tag
| Display | None |
| Start tag/End tag | Only start-tag |
| Usage | Anchors and links |
Example
Open in same window (by default)
In the above example we have used base URL =" https://www.javatpoint.com" which all other relative links will treat as starting URL. Here (/) defines the root URL of the current document.
Open in new window (using _blank in <base> tag):
In the above example we have used target="_blank" in only <base> tag but it is applied on whole document links.
Attribute
Tag Specific attributes:
| Attribute | Value | Definition |
|---|---|---|
| href | URL | It specifies the base URL for all relative links. |
| target | ||
| _blank | Open the relative link in the new window | |
| _self | Open the relative link in current window | |
| _parent | Open the relative link in the parent frame | |
| _top | Open the links in full width of the page |
Global Attribute
The <base> tag supports all global attributes in HTML
Event Attribute
The <base> does not support the event attributes in HTML
HTML <basefont> tag
(Not Supported in HTML5)
HTML <basefont> tag was used to specify the default value of font-size, color, and font-family for all content written within an HTML document.
Note: The <basefont> was deprecated in HTML 4 and completely removed from HTML5 so do not use this tag, instead of it you can use CSS to style the document.
Syntax
In HTML the closing tag </basefont> is not required but in XHTML the end tag is required.
Following are some specifications about the <base> tag
| Display | None (empty tag) |
| Start tag/End tag | Only start-tag |
| Usage | Font styling |
Example
Right way is to Use CSS to set the base font:
Attributes
Tag specific attributes:
| Attribute | Value | Description |
|---|---|---|
| color | color | Specify the default color of all text within an HTML document. (Not Supported in HTML5) |
| face | font-family | Specify the default font face for the text in the document. (Not Supported in HTML5) |
| size | number | Specify the size of the text. (Not Supported in HTML5) |
HTML <bdi> tag
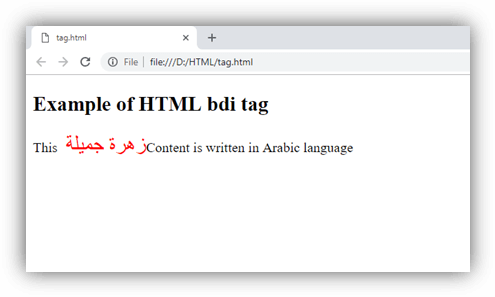
HTML <bdi> tag stands for Bidirectional Isolate Element. It is used to inform the browser to isolate the span of text which may be formatted in opposite directions than the surrounding text.
This tag is new in HTML5 and useful for languages such as Arabic or Hebrew, or if the browser dynamically inserts some text without knowing the directionality of text.
Note: The directionality of content inside <bdi> does not influence by the directionality of surrounding content.
Syntax
Following are some specifications about the <bdi> tag
| Display | Inline |
| Start tag/End tag | Both start and End tag |
| Usage | Semantic/textual |
Example
Output:
Attributes
Tag-specific attribute:
The <bdi> tag does not include any specific attribute
Global attribute:
The <bdi> tag supports all Global attribute
Event Attributes:
The <bdi> tag supports all Event Attributes
Difference between <bdi> and <bdo>
HTML <bdi> tag is new element of HTML5 and it is very similar to HTML <bdo> element. But the main difference in both the elements is that <bdi> tag isolates the content from its surrounding content but <bdo> tag reveres the direction. Sometimes <bdo> tag may cause some unexpected rendering errors so try to use <bdi> if required.
HTML <bdo> tag
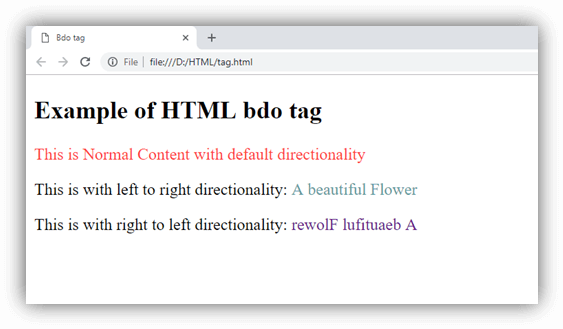
HTML <bdo> tag stands for "bidirectional override" which is used to overrides the current/default text direction. This tag sets the direction of content within it to render on browser from left to right or right to left.
The <bdo> tag is useful for the languages which are written from right to left such as Arabic and Hebrew.
Syntax
Following are some specifications about the <bdo> tag
| Display | Inline |
| Start tag/End tag | Both start and End tag |
| Usage | textual |
Example
Output:
Attributes
Tag-specific attributes
| Attribute | Value | Description |
|---|---|---|
| dir | ||
| ltr | Defines the directionality from left to right. | |
| rtl | Defines the directionality from right to left. |
Global Attributes
The <bdo> tag supports the Global attribute in HTML.
Event Attributes
The <bdo> tag supports the Event attribute in HTML.
HTML <big> tag (Not supported in HTML5)
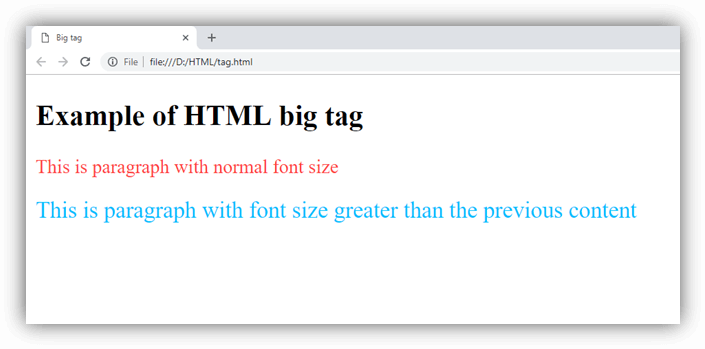
HTML <big> tag was used to increase the text font size one level bigger than the document's base font size or surrounding text size, such as small to medium, medium to large, etc.
NOTE: HTML <big> tag is no longer supported by HTML5, so you can use CSS to increase the font size.
Syntax
Following are some specifications about the <big> tag
| Display | Inline |
| Start tag/End tag | Both start and End tag |
| Usage | Fonts and Web Typography |
Example
Output:
Increasing Font-size using CSS property:
Output: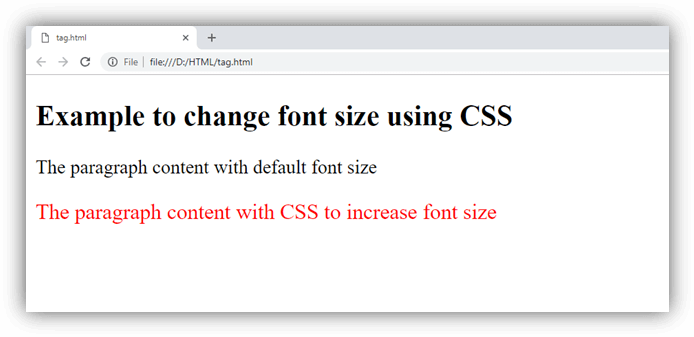
Attribute
Tag-specific Attribute:
The <big> element does not contain any specific attribute.
Global Attribute
The <big> element supports the Global Attribute in HTML.
HTML <blockquote> tag
HTML <blockquote> tag is used to define a block of text which is quoted from another source. The Browser usually displays the content within <blockquote> tag as indented text.
If you want to insert a long quote then use <blockquote> and for short or inline quote use <q> tag.
Syntax
Following are some specifications about the <blockquote> tag
| Display | Block |
|---|---|
| Start tag/End tag | Both start and End tag |
| Usage | Semantic/textual |
Example
Output: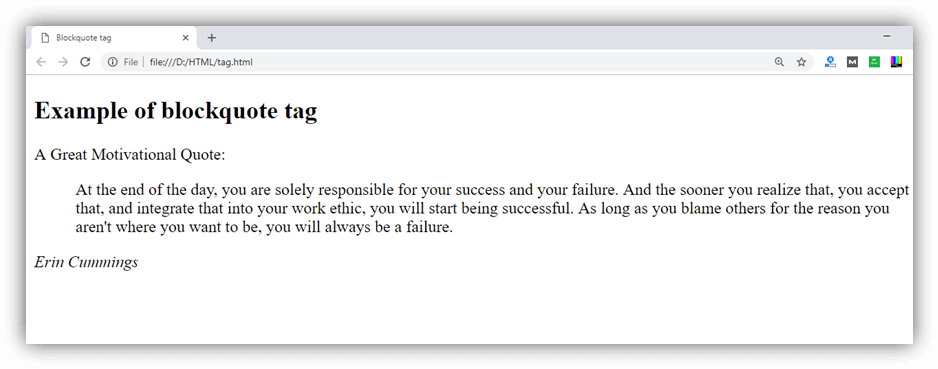
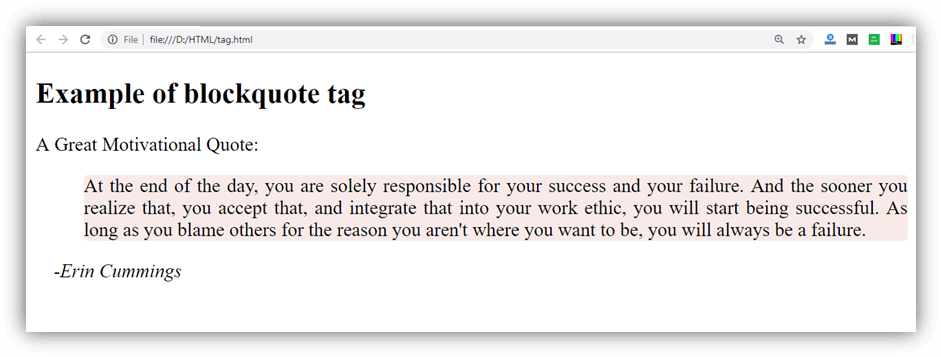
Styling <blockquote> tag
Note: We have used CSS property margin-right: 25px to change the indentation applied to the text. You can also use margin-left or margin shorthand property.
Output:
Attribute
Tag specific attribute
| Attribute | value | Description |
|---|---|---|
cite | URL | It is used to specify the URL of the source from where the quote is taken. |
Global attributes
The <blockquote> tag supports all the global attributes in HTML.
Event attributes
The <blockquote> tag supports all events attributes in HTML.
HTML <body> tag
HTML <body> tag defines the main content of an HTML document which displays on the browser. It can contain text content, paragraphs, headings, images, tables, links, videos, etc.
The <body> must be the second element after the <head> tag or it should be placed between </head> and </html> tags. This tag is required for every HTML document and should only use once in the whole HTML document.
Syntax
Following are some specifications about the <body> tag
| Display | Inline |
| Start tag/End tag | Both start and End tag |
| Usage | Structural |
Example
Output: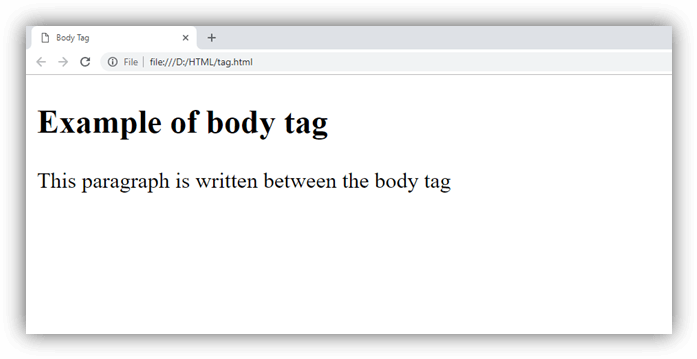
Attribute
Tag specific Attributes
| Attribute | Value | Description |
|---|---|---|
| alink | color | It defines the color of the active link in a document. (Not supported in HTML5) |
| background | URL | It determines the background image for the document. (Not supported in HTML5) |
| bgcolor | color | It determines the background color of the content. (Not supported in HTML5) |
| link | color | It determines the color of the unvisited link. (Not supported in HTML5) |
| text | color | It determines the color of the text in the document. (Not supported in HTML5) |
| vlink | color | It determines the color of the visited link. (Not supported in HTML5) |
| onload | Function call on page loading | |
| onunload | Function call when user leaves the page | |
| onfocus | Function call when document receives focus by user. | |
| onblur | Function call when document loses focus by user. |
Global Attribute
The <body> attribute supports global attribute in HTML.
Event Attribute
The <body> attribute supports Event attributes in HTML.
HTML <br> tag
The <br> tag in HTML document is used to create a line break in a text.
It is generally used in poem or address where the division of line is necessary. It is an empty tag, which means it does not need a company of end tag. If you place the <br> tag in the HTML code, then it works the same as pressing the enter key in a word processor.
Note: Don't use br tag for the margin between two paragraphs, use CSS margin property instead.
Syntax
Difference between HTML <br> and <br/>
You can use HTML br tag two ways: <br> or <br/>. It is recommended to use closed br tag <br/> because it is supported in HTML and XHTML both.
Example 1:
Output:

Example 2: The following example uses the <br> tag in the address:
Output:
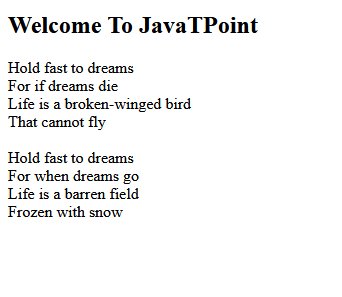
Example 2: The following example uses the <br> tag in the poem:
Output:

HTML Button Tag
The <button> tag is used to create a clickable button within HTML form on your webpage. You can put content like text or image within the <button>........</button> tag.
You should always specify the type attribute for a <button> tag. Different browsers use different default type for the button element.
HTML Button tag can be used inside and outside the form.
If you use it inside the form, it works as the submit button. You can also use it as reset button.
If you use it outside the form, you can call JavaScript function on it.
HTML Button Tag Example
Let's see the code to display the button.
Output:
HTML Button Example: Calling JavaScript Function
Let's see the code to call JavaScript function on button click.
Output:
HTML Button Example: Submit Form
Let's see the code to submit form on button click.
Output:
HTML Button Example: Reset Form
Let's see the code to submit form on button click.
Output:
Attributes of HTML Button Tag
<button> tag supports all global attributes and some specific additional attributes.
There is given a list of HTML button tag attributes.
| Attribute | Description |
|---|---|
| autofocus | It specifies that a button should automatically get focus while the loading of the page. |
| disabled | It specifies that a button shuld be disabled. |
| form | It specifies one or more forms that the button belongs to. |
| formaction | It is used for submit type. It specifies where to send the form data when form is submitted. |
| formmethod | It specifies how to send form-data. |
| formenctype | It specifies how form-data should be encoded before sending it to server. |
| formnovalidate | It specifies that the form data should not be validated on submission. |
| formtarget | It specifies that where to display the response after submitting the form. |
| name | It specifies the name of the button. |
| type | It specifies the type of the button. |
| value | It specifies the value of the button. |
HTML Canvas Tag
The HTML canvas element provides HTML a bitmapped surface to work with. It is used to draw graphics on the web page.
The HTML 5 <canvas> tag is used to draw graphics using scripting language like JavaScript.
The <canvas> element is only a container for graphics, you must need a scripting language to draw the graphics. The <canvas> element allows for dynamic and scriptable rendering of 2D shapes and bitmap images.
It is a low level, procedural model that updates a bitmap and does not have a built-in scene. There are several methods in canvas to draw paths, boxes, circles, text and add images.
How to create a HTML canvas?
A canvas is a rectangle like area on an HTML page. It is specified with canvas element. By default, the <canvas> element has no border and no content, it is like a container.
HTML 5 Canvas Tag Example
Output:
Note: It is always necessary to specify the id attribute and the height & width attribute to define the size of the canvas. You can have multiple canvas elements on one HTML page.
Supporting Browsers
| Element | Chrome | IE | Firefox | Opera | Safari |
| <canvas> | Yes | Yes | Yes | Yes | Yes |
HTML Canvas Tag with JavaScript
A canvas is a two dimensional grid.
Coordinates (0,0) defines the upper left corner of the canvas. The parameters (0,0,200,100) is used for fillRect() method. This parameter will fill the rectangle start with the upper-left corner (0,0) and draw a 200 * 100 rectangle.
Output:
Drawing Line on Canvas
If you want to draw a straight line on the canvas, you can use the following two methods.
moveTo(x,y): It is used to define the starting point of the line.
lineTo(x,y): It is used to define the ending point of the line.If you draw a line which starting point is (0,0) and the end point is (200,100), use the stroke method to draw the line.
Output:
Drawing Circle on Canvas
If you want to draw a circle on the canvas, you can use the arc() method:
To sketch circle on HTML canvas, use one of the ink() methods, like stroke() or fill().
Output:
Drawing text on canvas
There are property and methods used for drawing text on the canvas.
font property: It is used to define the font property for the text.
fillText(text,x,y) method: It is used to draw filled text on the canvas. It looks like bold font.
strokeText(text,x,y) method: It is also used to draw text on the canvas, but the text is unfilled.
Let's see fillText() method example.
Output:
Let's see strokeText() method example.
Output:
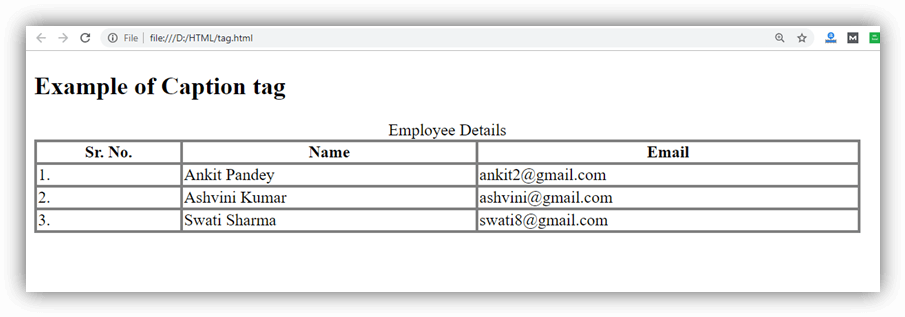
HTML <caption> tag
HTML <caption> tag is used to add a caption or title of an HTML table. It should be used inside the <table> element and just after the <table> start tag. A table may contain only one <caption> element.
Syntax
Following are some specifications about the <caption> tag
| Display | Inline |
| Start tag/End tag | Both start and End tag |
| Usage | textual |
Example 1
Output:
Attribute
Tag-specific Attributes
| Attribute | Value | Description |
|---|---|---|
| align |
| It aligns the caption with respect to table |
HTML <center> tag (Not Supported in HTML5)
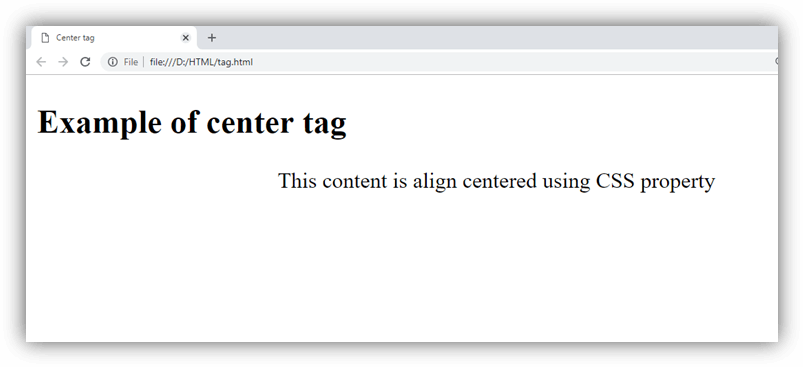
The HTML <center> is a block level element which contains both block level and inline contents within it. The content written between the <center> elements will be displayed at the middle of the page.
The <center> tag has been deprecated in HTML 4 and obsolete in HTML5.
NOTE: The <center> tag is deprecated now so instead of that you can use CSS property text-align: center; to achieve the same result.
Syntax
Following are some specifications about the <center> tag
| Display | Inline |
| Start tag/End tag | Both start and End tag |
| Usage | textual |
Example
Using <center> tag
Using CSS
Output:
Attribute
HTML <center> tag does not contain any specific attribute in HTML but it supports the Global Attribute (till <center> tag is not removed completely).


 Aondover Pascal. O


0 Comments